
Software Engineer
How to build a chatbot for your website? Part 4: Training the chatbot model
Introduction
Welcome to Part 4 of my article series, "How to Build a Chatbot for Your Website?". In Part 3, we created a functional frontend code ready to interact with our backend API. In this part, we will focus on training the model rather than coding the backend. Machine learning (ML) training is a complex topic that deserves its own dedicated part.
My articles primarily aim to share my thought process rather than provide coding instructions. Additionally, my discussion is confined to a single feature - the chatbot, not an entire web application. The source code for this article can be found in my Git repository. The training code for this part was taken directly from this repository by Patrick Loeber, with changes made only where I thought they would be interesting and useful.
Requirements for the chatbot
The functionality of this chatbot is straightforward and includes basic features suitable for a simple website:
- The model receives a question input from the client and responds with an answer.
- The model tries to find the best answer possible from the given database.
- There is an easy setup to retrain our model if we decide to add new questions.
About Artificial Intelligence and Machine Learning
Let's start by defining these two terms. Artificial Intelligence (AI) refers to the theory and development of computer systems capable of performing tasks that typically require human intelligence. These tasks include visual perception, speech recognition, decision-making, and language translation. Machine Learning (ML) is a subset of Artificial Intelligence (AI) that focuses on enabling machines to learn from data and improve their performance over time without being explicitly programmed.
Now, let's explain these concepts in simpler terms. Essentially, ML aims to find patterns in data. When the relationship between two things is complex, ML hypothesizes that there is a process we don't fully understand but can try to model. For example, when we press the gas pedal on a car and the car goes faster, we don't need to know how engines work to see that relationship. We only see the beginning and end of the process. To be a very good professional driver, it is useful to know how car engines and transmissions work, to have what they call mechanical sympathy. However, it is not indispensable for having an acceptable driving experience if you have good car insurance.
Machine Learning (ML) attempts to "understand" the process A (Pressing the gas pedal) --> Causal Mechanism --> B (Car goes faster) by analyzing instances where A and B occur together. It is a highly sophisticated mathematical method of "trial and error." Admittedly, it is quite complex and sophisticated. Some people may find it offensive to characterize it as trial and error. However, I believe it is important to make these technologies accessible and attractive to many people. Therefore, I want to emphasize that they are not as intimidating as they seem.
There are several reasons why ML performance has improved in recent decades:
- There is more data available for applying trial and error.
- We have better computers capable of running long processes of trial and error.
- Smart people have developed better methods of trial and error.
All of these factors have come together to generate impressive results in AI. AI/ML will be ubiquitous wherever computers are used, so we will all need to learn about it.
Enough of philosophical meandering, let's get to more practical things.
How do chatbots work?
Intent classification
In chatbots, we use an approach called intent classification. Intents are the purposes behind users' messages or questions. For example, if someone asks "Your name?", "What's your name?", or "Identify yourself, please", they likely want to know who we are. Despite different wordings, these questions share the same intent. We call these questions and phrases patterns, and the chatbot's answers responses. Therefore, chatbots need a method to match these differently-worded inputs to intents. Simply put, the process can be presented as a flow: Patterns --> Intents --> Responses.
Large language models, such as LLaMA and Claude, can recognize intents. These models are designed to understand and interpret user inputs, making them capable of identifying the underlying intent behind a user’s query. However, we are not using these models. We aim to build a small, independent chatbot. This means we need to have our own data to train our model.
A simple data structure
Here is a basic structure for our data in JSON format. All intents are presented in a list (also known as an array) data type []. Each intent has a tag indicating the name of the intent, a patterns field that includes questions falling under this intent, and a responses field that includes the answers our chatbot will provide to the client.
{
    "intents": [
        {
            "tag": "greeting",
            "patterns": ["Hi", "Hey"],
            "responses": ["Hello","Hi"]
        },
        // ... other intents here
    ]
}
We can design our data structure in any way we prefer, as long as we understand what each choice represents. We can use different terms to name the tag, patterns, and responses fields. We don't need to have many items in the patterns and responses fields. Each response can include more than one sentence. We can have as many intents as we want, but we need to keep in mind that it will take longer to train the model and generate an answer from it. Additionally, we can add extra fields to the dataset if we want to introduce new features to the chatbot. In fact, we will do that later.
Our chatbot must be able to follow these steps:
- Get the input phrase from the user
- Find the matching intent (tag)
- Output one of the responses
Getting the input phrase from the user is done by the system outside the chatbot and delivered to the chatbot as a string, for example, "Hi". Finding the matching intent could be achieved by iterating through all intents in the list and searching for the text "Hi" in the patterns fields of intents. That would be a brute-force approach and wouldn't be effective, especially as the data size grows. We need a smarter way of doing that.
Outputting one of the responses is straightforward. We simply return one of the items in the responses array. We can return it randomly to create the illusion of artificial intelligence. In such chatbots, we want to ensure that our responses are friendly to users, so they are carefully phrased to be polite and useful. We don't want our visitors to see random, half-baked sentences with offensive or nonsensical words. Using the technical term, we can say that our system is deterministic or predictable. We have clear rules about which answers are issued and when. In a larger AI model, it doesn't have to be so. Large models can generate synthetic responses without pre-defined rules. Our model is a small one, so we want to ensure that it issues good sentences.
As you can see, the core component of our chatbot is finding the best matching intent tag for the input phrase. Now we need to understand how ML works with text. Computers are good at calculating and comparing numbers. Even when we give them non-numeric data such as images, texts, or sounds, they convert everything to numbers and work on those numbers. Therefore, ML will convert our input texts and intent tags to numbers and find a relationship between them. There is no need to do anything with responses because the relationship is between input questions (patterns) and intents (tags).
Converting text to computer-friendly numbers
To help computers understand text, we need to convert human-friendly text into computer-friendly numbers through several steps:
Tokenization: The text is broken down into smaller parts. For example, the input "Where does he want to work?" is converted into a list of tokens: ['Where', 'does', 'he', 'want', 'to', 'work', '?'].
Removing Less Important Parts: Unnecessary tokens, such as punctuation marks, are removed. For instance, ['Where', 'does', 'he', 'want', 'to', 'work', '?'] becomes ['Where', 'does', 'he', 'want', 'to', 'work']. Sometimes, stop words like "the," "can," and "am" are also removed, leaving only ['want', 'work'].
Lowercasing: All words are converted to lowercase, making the text case-insensitive. The result is ['where', 'does', 'he', 'want', 'to', 'work'].
Stemming: Words are reduced to their root form. For example, "going" is converted to "go." In our case, the result is ['where', 'do', 'he', 'want', 'to', 'work']. Note that different stemming implementations may produce varying outputs.
Bag of Words: The stemmed tokens are converted into a bag of words, a simple method to get a numeric representation of a sentence. First, a list of all unique words is created from the model by analyzing patterns from the intents data. These words are the basic elements that constitute each pattern. For example, if unique_words = ['are', 'bye', 'car', 'how', 'thank', 'you'], then the pattern ['how', 'are', 'you'] is converted to an array where each word is replaced by its frequency in the unique words list: bag_of_words = [1, 0, 0, 1, 0, 1].
Using the stem of a word, like 'go', instead of its variations ('goes', 'going', 'went', 'gone'), reduces the size of the global unique words dictionary, improving model performance.
Converting Tags to Numbers: Each intent tag is assigned a unique number, corresponding to its index in the intents list. This step is straightforward.
Now, we have a table ready for the machine to learn from through trial and error. In practice, these tables will have more rows, allowing the machine to learn which pattern belongs to which class.
| Pattern code of the input sentence | Intent |
|---|---|
| 00001000010 | 4 |
| 00001001010 | 3 |
| 00001000010 | 1 |
| 10001101010 | 2 |
Trying to discover the model
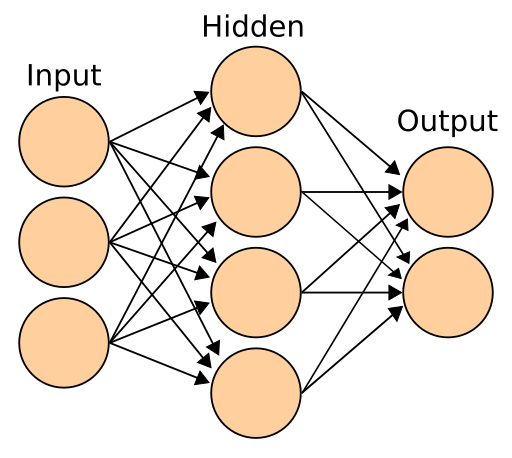
There are many different machine learning methods, but we will use Neural Networks because predicting the intent of a sentence or question is a subset of classification tasks. The theory behind neural networks is quite complex, so I will explain the basics in simple terms. My goal is not to teach everything about it but to encourage you to learn more.
A neural network can be represented with a diagram, as shown in Figure 1. You have a group of input nodes, called a layer. Then, there is a layer of hidden nodes and an output layer. Training a model means understanding how all those arrows impact the nodes. We observe the input and output layers, but we don't know for sure what's happening in the hidden layer. When we train a model, the program creates thousands or millions of combinations, depending on the task's complexity. We try to find the combination that predicts the result with the highest accuracy.
I want to give you an analogy. Imagine an unimaginable situation where you are asked to understand how a sound system works in a studio by trial and error. There is no guidance or help from outside. You can play with the knobs, sliders, and cables, and listen to the sound as many times as you need. The stakes are very high, and you need to do it. The equipment is shown in Figures 2 and 3.
What would you do? You would start by testing the effect of changing each knob, slider, and switch on the sound coming from the speakers. You would try connecting cables to different inputs and outputs. You would meticulously write down the results of each test. You would eliminate awful-sounding combinations from your list and keep tolerable combinations in your "maybe" list. After thousands of tests, you would find some setups that sound pretty good. Training a machine learning model is similar to this process. We are trying to understand how different knobs, cables, switches, and sliders work together to create an output. We need to put "understand" in quotes because even if you end up learning how to set up the sound system, you don't really understand the electronics in the equipment. In machine learning, too, we don't really understand but try to build a system that can produce useful results.
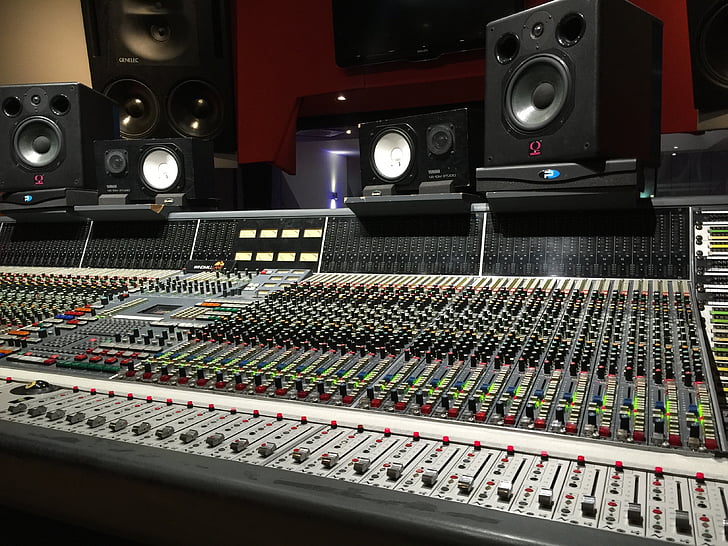
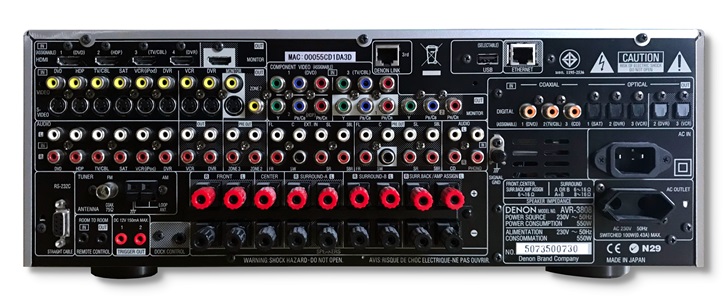
In the sound system example above, you might say, "I wouldn't try blindly; I would read the manuals and look at the colors, icons, and abbreviations next to the sockets." Similarly, in machine learning, we don't build models out of nowhere. We use our knowledge about the problem domain, our experiences, and everything else we can to build a good model. We start with a simpler model, and if we don't get the desired results, we try to change it, make it more complex, or alter its structure. Now we can proceed to coding.
Coding the code
Preparing the Jupyter lab environment
We will use the PyTorch machine learning library to train our model. First, we need to set up our environment. Instead of running everything in a CLI, I suggest you create a virtual environment, install Jupyter, and run the code from there. With a Jupyter notebook, you can easily run, change, and test code. Go to the folder you want to work in and run the following commands.
$ python3 -m venv venv
$ . venv/bin/activate # In Windows venv/scripts/activate
$ (venv) pip install jupyter
$ (venv) pip install ipykernel
$ (venv) python -m ipykernel install --user --name=venv --display-name "Python (venv)"
$ (venv) jupyter-lab
This will launch your browser and open http://localhost:8888 with an in-browser IDE. You can then work on the notebook chatbot-train.ipynb and other files you would like to change. Please keep in mind that launching jupyter-lab when you are in a virtual environment is important. This ensures that Jupyter will use your virtual environment with all installed dependencies. If you don't want to use Jupyter, you can use another IDE or use command line tools.
Important
If setting up the runtime environment proves challenging due to incompatible versions of Python, Torch, distutils, or NumPy, don't get discouraged. Carefully read the error messages and resolve the issues step-by-step. Although setting up the runtime environment can be difficult, the rest of the process will be much easier.
You have the complete code files in the repository, so I will focus only on the most important parts here.
Create a Neural Network model
The code is located in the model.py file. Refer to the diagram in Figure 1 for a better understanding of this class. We use the nn module from torch, which consists of three layers: an input layer, a hidden layer, and an output layer.
Why did we choose to have only one hidden layer? For tasks like basic classification or regression, a single hidden layer is often sufficient. If the problem were more complex, adding additional hidden layers would be justified.
Remember the sound system model mentioned earlier. This class takes the input layer size, hidden layer size, and the number of classes (tags) as its input parameters.
import torch
import torch.nn as nn

class NeuralNet(nn.Module):
    def __init__(self, input_size, hidden_size, num_classes):
        super(NeuralNet, self).__init__()
        self.l1 = nn.Linear(input_size, hidden_size)
        self.l2 = nn.Linear(hidden_size, hidden_size)
        self.l3 = nn.Linear(hidden_size, num_classes)
        self.relu = nn.ReLU()

    def forward(self, x):
        out = self.l1(x)
        out = self.relu(out)
        out = self.l2(out)
        out = self.relu(out)
        out = self.l3(out)
        # no activation and no softmax at the end
        return out
There are three functions in nltk_utils.py file. I explained the purpose of these functions above.
Steps of the Training Process
Here are the steps of the training process. You can find the code and guiding comments in the files.
- Load the intents data file in JSON format. Although it could be in any format, this code uses a JSON file.
- Create a dictionary of unique words and a list consisting of pairs of patterns and tags.
- Remove punctuation marks, convert words to lowercase, find their stems, and sort the words and tags list.
- Create the training data. Convert everything to numbers, assigning patterns to the
Xvariable and tags to theYvariable. - Set the hyperparameters for the training. Hyperparameters are configuration settings that you set before training a model.
- Create a dataset and data loader to feed the training data into the model.
- Train the model using the hyperparameters.
- Convert the model into a Python dictionary and save it to a file for future use.
How Does the Model Find the Intent?
Our model calculates the probability of a pattern belonging to each intent. For example, if there are 20 intents, 20 different probabilities are calculated. The intent with the highest probability is considered the correct intent. However, if the probability is too low, it may not be acceptable, so you can decide the level of confidence that is acceptable to you.
Creating Intents File from an Excel Spreadsheet
If you decide to build your own chatbot, editing JSON files can be difficult and error-prone. I used an Excel spreadsheet to write my questions and then used a Python script to convert the data to a JSON file. Excel is easy to edit because it is in tabular form. While we could skip JSON entirely and use Excel to train and load data, JSON is more native to Python and doesn't require external libraries like Excel does. That's why it makes sense to use JSON for training and production.
If you decide to use this file, don't forget to install openpyxl. You can write your questions and intents next to each other and group similar questions under one intent. The questions and intents you add are up to you. Questions with the same intent will be grouped under one intent. The PROPOSABLE field in the Excel file determines whether the chatbot can propose that question to the user. You can set it to TRUE if you want your question to be proposed. This is part of a new feature you can develop further, which I will discuss in Part 5.
Key takeaways
In conclusion, here are my key recommendations for the training phase:
- Don't give up if setting up the runtime for
torchturns out to be challenging. - Experiment with different epoch numbers, batch sizes, and hidden layer sizes to observe the loss variation.
- Use a Jupyter notebook to run the model, as it makes visualization and debugging easier.
- Use an easy-to-edit program for creating your question dataset; I used Excel.
- For any part of the code you want to learn more about, consult your favorite AI assistant.
The full code for this article is available at this repository.
With our frontend code in place, we are now ready to proceed with training our machine learning model. See you in Part 5.
- #chatbot
- #ai
- #coding
- #python
- #pytorch
- #javascript
Hello! How can I help you today?
- Hello! I am an AI chat assistant representing Nazar. You can ask me questions as if I am Nazar.2:09 AMTell me about yourself?
