
Software Engineer
How to build a chatbot for your website? Part 1: System Design
Introduction
Recently, I decided to combine my full stack development skills, including machine learning, to add a new feature to my website: a chatbot. I’m excited to share with you the journey of creating it. I will divide the story into several smaller parts instead of making a huge blog. In this series, I also want to touch upon theoretical issues and link my thoughts to general software engineering concepts. Specifically, I want to share with you some design decisions and the thinking behind them. If you want to see the chatbot visit my website or you can visit the Github repository to see the code.

Using Angular, a powerful web application framework, I was able to build a dynamic and responsive user interface for the chatbot. Angular’s robustness and flexibility made it an ideal choice for this project.
To make the chatbot visually appealing and user-friendly, I turned to Tailwind CSS, a utility-first CSS framework. Tailwind CSS allowed me to customize the chatbot’s design elements to the finest detail, ensuring a seamless user experience.
But what’s a chatbot without some intelligence? That’s where Machine Learning came into play. I used publicly available machine learning algorithms and created my own simple question-answering machine. The chatbot was trained to understand and respond to user queries effectively.
Components of a chatbot system
So, what are the main components of a chatbot system? The answer to this question depends on the level of detail we want to explore. However, I divide this system into the following components. In real-life, large-scale applications, each of these components is delivered by respective roles (indicated in parentheses).
- System design (System Architect)
- Frontend design (UI/UX Designer)
- Frontend coding (Frontend Developer)
- Training model (Machine Learning Developer)
- Writing backend service (Backend Engineer)
- Deploying the service (DevOps Engineer)
While these components may seem straightforward to seasoned developers, it’s crucial for novice web developers to thoroughly understand them. I will structure the segments of this series based on the aforementioned list, starting with Part 1, which focuses on System Design.
How did I approach the system design issue?
Having previously utilized chatbots as a customer service channel on various websites, I was inspired to create a similar tool. However, this chatbot would be designed to answer questions about me. For the initial prototype, the ability to respond to simple inquiries should suffice. While I aimed for visual appeal, a fundamental level of UI/UX was deemed suitable for the first version. Aesthetically, I envisioned it to resemble Figure 1.
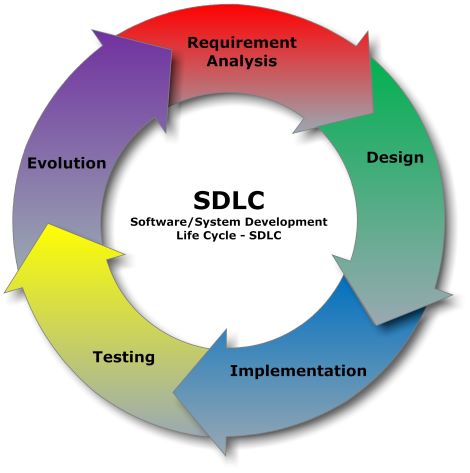
In an implicit manner, I adhered to the Software Development Life Cycle (SDLC) methodology. The initial step involved Requirements Analysis, as depicted in Figure 2.
The following were my general technical requirements:
The chatbot implements general chatbot UX/UI practices
- A compact button that enlarges upon interaction
- Users have the ability to pose questions, to which the server provides responses
- The window offers a minimization feature for user convenience
In this instance, I adhered to practices commonly observed on other websites. Rather than innovating, I chose to conserve time, given that this aspect is not critical to the business in this context.
The Chatbot Seamlessly Integrates with My Existing Website Design
- It employs a well-regarded JavaScript framework
- It utilizes a CSS framework
Given that my current website operates on the Angular framework, it is imperative that the chatbot is also constructed using the same. For visual consistency, the styling should be based on Tailwind CSS, aligning with the aesthetic of my fully operational website.
The Chatbot System Ought to Be Modular
The frontend operates within the browser The backend functions on a distinct service By segregating the frontend and the backend, we can ensure that these systems operate independently. This means that a failure in one does not affect the other. In technical terms, this structure is referred to as a loosely coupled design.
The System Operates on a Compact Server
- The ML model doesn’t necessitate substantial computational resources
- It can be accommodated within a diminutive virtual machine
I aimed to minimize expenditure on this server. Ideally, it should be a cost-free server. In this specific scenario, I opted for an AWS EC2 instance, as it presented the most economical option for me.
Iterative thiking instead of linear thinking
In retrospect, everything may appear linear. However, during my contemplation of these issues, I engaged in numerous iterations, continually redefining and refining my thoughts. The World Design Organizations characterize Design thinking as an iterative process. Particularly when designing such a system for the first time, the next technical hurdle remains unknown. Consequently, openness to various approaches and decisions is essential. Only after gaining some experience do you understand what works and what doesn’t. At that point, you can apply your newly acquired skills and knowledge in a linear fashion. However, an element of iteration will always persist unless you are replicating an existing system.
When I designed my product I started from the basic parts which can impact the design of the system. For instance, there is no need to worry about colors or icons too much. But how the question-answering server works is an important element. How the frontend interacts with the backend is another important element. Therefore, I focused on client-server interaction in the beginning and tried to establish a working system as soon as possible. Only after that I tried to improve visual elements and to add additional features such as basic error handling.
Using AI effectively
Whenever I encountered questions about the concept or the construction of the system, I turned to Copilot. It served as a valuable resource for design, idea generation, sample question creation, and understanding server concepts as well as the intricacies of Angular and Tailwindcss. This tool proved to be a significant time-saver.
In this project, I utilized a variety of technologies, including Angular, Javascript, Tailwind, Node.js, Python, JSON, Windows, Linux, Nginx, Gunicorn, and Flask. Remembering the entire syntax for programming these technologies is a daunting task. Moreover, significant or breaking changes can occur across versions. This is where tools like Copilot and ChatGPT prove invaluable. I leveraged AI as a guide in my work, acting as a second ‘self’ performing manual tasks that would otherwise fall to me.
However, to effectively utilize AI in programming, it’s crucial to understand how to write prompts, such as “How to create a dictionary and get the number of keys in it?” In this instance, “dictionary” and “key” are programming concepts. Understanding their meaning and purpose will enable you to craft effective prompts, thereby obtaining the desired AI results more quickly.
Technology stack
The same result can be achieved with other technologies and tools, but in this project I used the following technologies:
- Backend server - Linux, Nginx, Gunicorn
- Backend application - Flask, Python
- Frontend framework - Angular styled with Tailwindcss
- Client-Server communication - REST API using JSON
- Machine learning model - PyTorch, NeuralNet
Key takeaways
In conclusion, here are my recommendations for the System Design phase:
- Think about your system broadly and make sure that you know what you want to build.
- Adopt an iterative approach, concentrating on the fundamental components of your system.
- AI is an invaluable ally in constructing such a system, so harness its capabilities to the fullest extent.
See you in Part 2.
- #chatbot
- #ai
- #angular
- #tailwindcss
- #systemdesign
- #sdlc
Hello! How can I help you today?
- Hello! I am an AI chat assistant representing Nazar. You can ask me questions as if I am Nazar.2:09 AMTell me about yourself?
